I've decided to start a reoccurring post called "ban the worksheet" due to my frustrations of teachers using worksheets on a daily basis. Let me start off by saying I hate worksheets and they do not do anything for today's learner. My favorite subject to teach is math and because I teach the struggling students it's even more important they have daily activities that are hands on and authentic tasks. Most authentic tasks require little work on the teachers end and allow for easy differentiation. Having a simple rubric will allow you to grade while students are presenting or anecdotal notes as they work. Here are my ideas for elementary geometry activities.
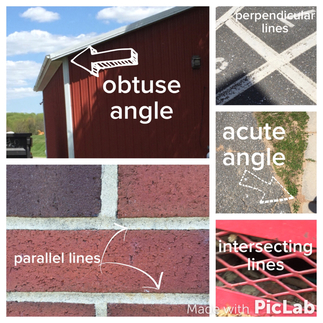
1. Digital scavenger hunt
After learning the main vocabulary, give student pairs/groups digital cameras and have them go around the school grounds taking pictures of these terms in the environment (inside or out). Some ideas for their hunt: 3 obtuse angles, 3 acute angles, 3 right angles, a set of parallel lines, perpendicular lines, a point, intersecting lines, different shapes or solid figures.
If you have access to iPads, you don't even have to worry about downloading images off a camera, you can have them share on the iPad or use the computer application Reflector to reflect the images on your laptop and through the projector. You can even give students a grade on the rubric for their speaking and listening explanation of what their pictures fit each term.
2. Map Measuring
Find and print road maps of interesting places. Perhaps a map of your school district, a map of your city, or a different places you might be studying in science, social studies, or even a book you are reading in ELA. Ask students to measure different angles formed by intersections. For example, using this part of a map of downtown Baltimore, measure the angle formed by S. President St. and Eastern Avenue. Before even measuring the angles, you could have students identify intersections forming right, obtuse, and acute angles.
Find and print road maps of interesting places. Perhaps a map of your school district, a map of your city, or a different places you might be studying in science, social studies, or even a book you are reading in ELA. Ask students to measure different angles formed by intersections. For example, using this part of a map of downtown Baltimore, measure the angle formed by S. President St. and Eastern Avenue. Before even measuring the angles, you could have students identify intersections forming right, obtuse, and acute angles.
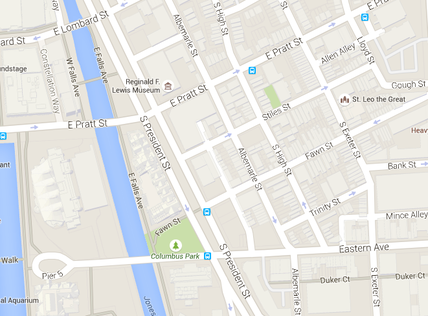
Google maps
3. Map Creation
Once students have mastered measuring angles, it's time to have them be able to create angles. Have students design their own city or town. Give them requirements that must be in their map and allow them to be creative. For example: 3 right angles, 2 obtuse angles, 2 acute angles, a set of parallel lines, a set of intersecting lines, etc. If you have an inclusion class, you can simple reduce the number of items the students need to have however they can still complete the same project.
4. Design a Robot - Quadrilaterals
When working on the types of quadrilaterals, have students design a robot. They can either draw it (using grid paper often helps) or cut out paper and make a collage. It helps if they make their own quadrilateral glossary first.
5. Triangle Straws
You will need a box of straws that are a mix of colors. I used neon colors. Give students a large size piece of posterboard or construction paper (12"x18"). Put on the board the 3 types of triangles when classifying by sides (equilateral, isosceles, and scalene). Ask students how they could represent each type of triangle with the straws and allow them to brainstorm in groups. Have students cut the bendy part of the straws off and arrange their straws to form the triangles. Once approved they can tape them down, measure and label each side, and then label the type of triangle.

 RSS Feed

